 Deutsch (Deutschland)

Sling Operations
This aircraft can be equipped with a cargo hook and a winch. Choose a livery with the respective equipment or change the configuration of your livery by using the configurator.
Basics of sling operations
Use the menu at a starting point.
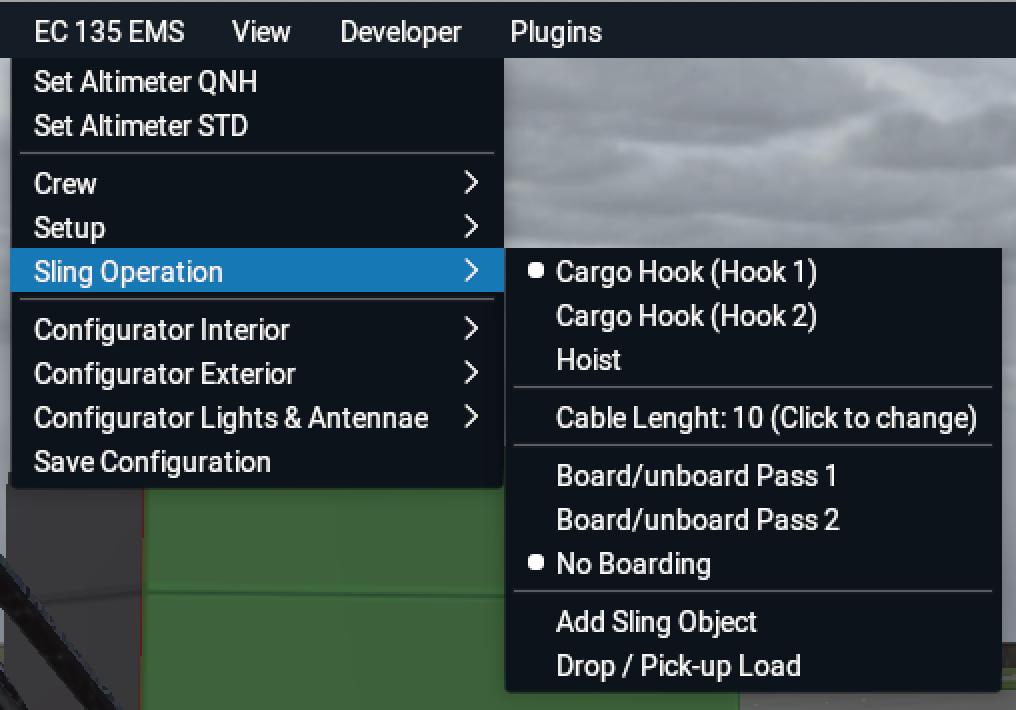
In the upper area of the menu you can select the attachment point for a load:
- 1st hook of the Cargo Hook supplement.
- 2nd hook of the Cargo Hook supplement.
- Rescue winch.
The menu points are only available if the respective supplement is installed. They are also disabled if any load is attached to avoid accidentally change while flying.
In the lower area of the menu you can operate the sling load settings:
- is an alias to X-Planes menu where you can choose an object to attach.
- is the menu representation of the custom command Toggle Sling Load which allows you to drop or pick up the attached object keeping the cable. This only works with objects designed for this purpose.
To initiate sling operations we recommend the following procedure:
- Choose the intended attachment point (one of the cargo hooks or the winch).
- Choose your object for example by clicking to .
- If necessary, click on or pressing Toggle Sling Load to hide the object an actually attach it during the flight.
Pay attention to the maximum gross mass for all sling operations! If in doubt, take less fuel with you or reduce the weight of the helicopter otherwise.
For all sling operation it is necessary to assign X-Plane's command Jettison Payload to a button on your stick or keyboard. This opens the hook and releases the load as standard or an emergency operation.
Cargo Hook
Cargo Hook is ready to use when it is installed. This supplement has two hooks to choose from. The maximum load is 1300 kg. When installed and not loaded with a weight, an advisory HOOK UNLD appears in middle column of CAD. VNE with attached load is limited to 100 KIAS.
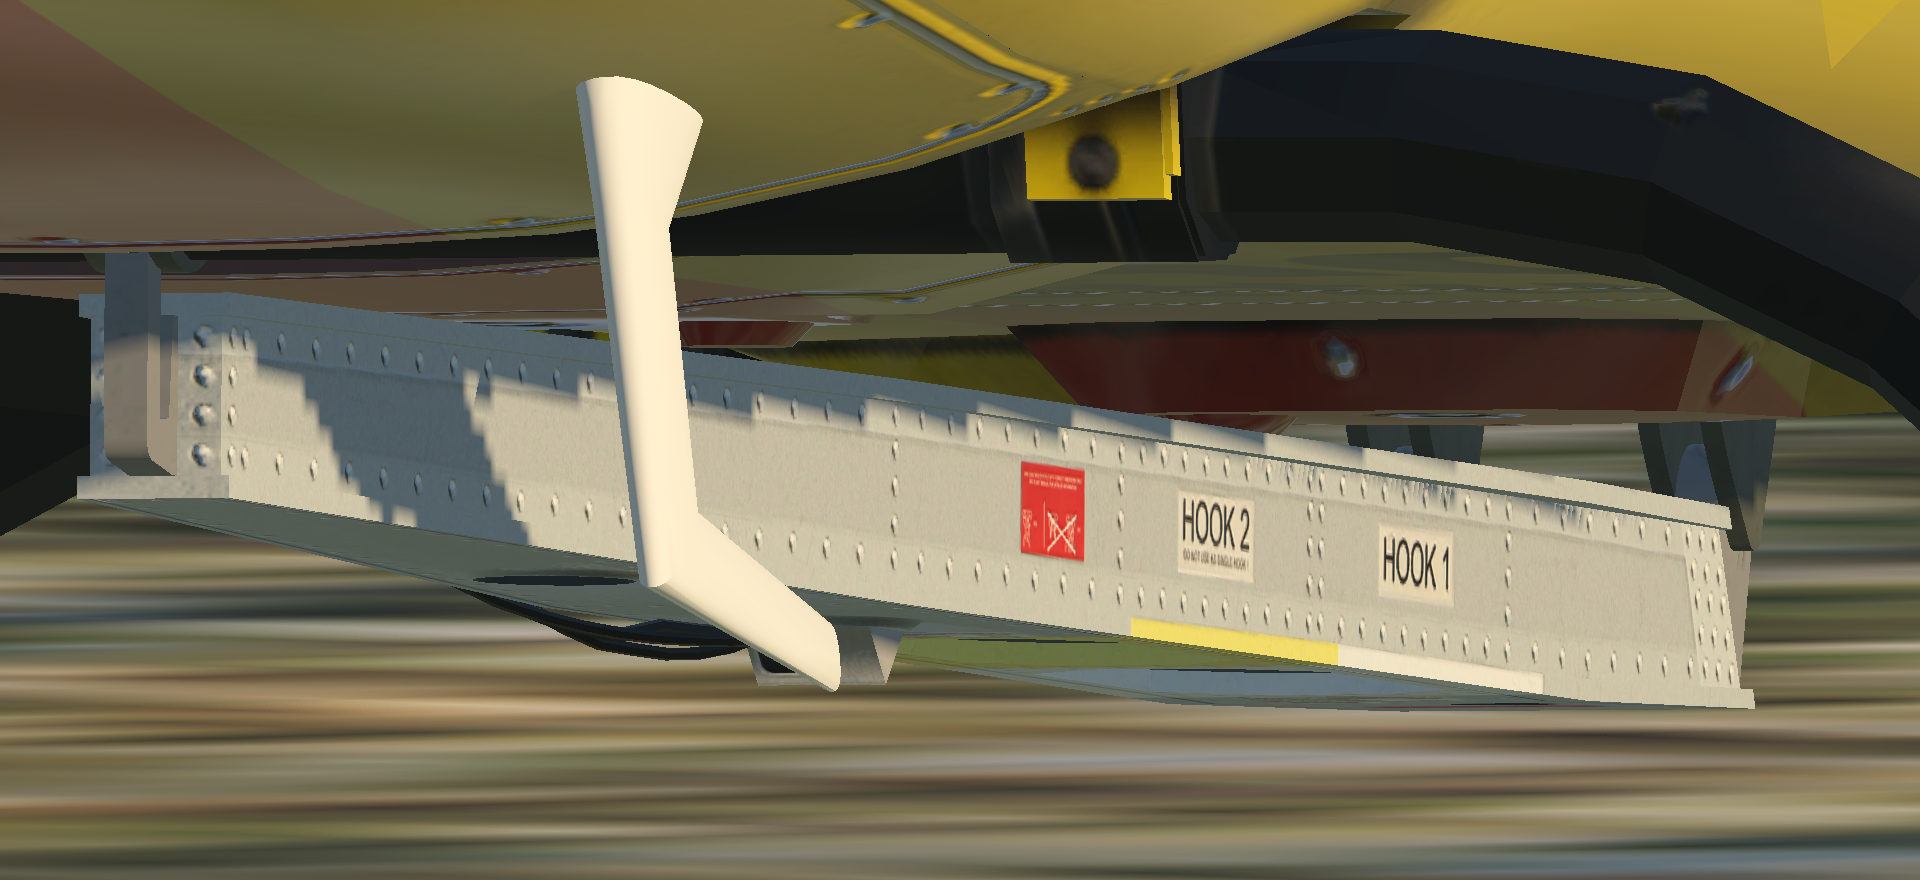
To change the length of the cable, click on the menu item. You can switch between three preset lengths: 10 m, 20 m or 30 m. This is only possible when hook is not loaded.
Press Toggle Sling Load to drop the object keeping the cable or re-attach it to the cable. Press Jettison Payload to drop the load including the cable.
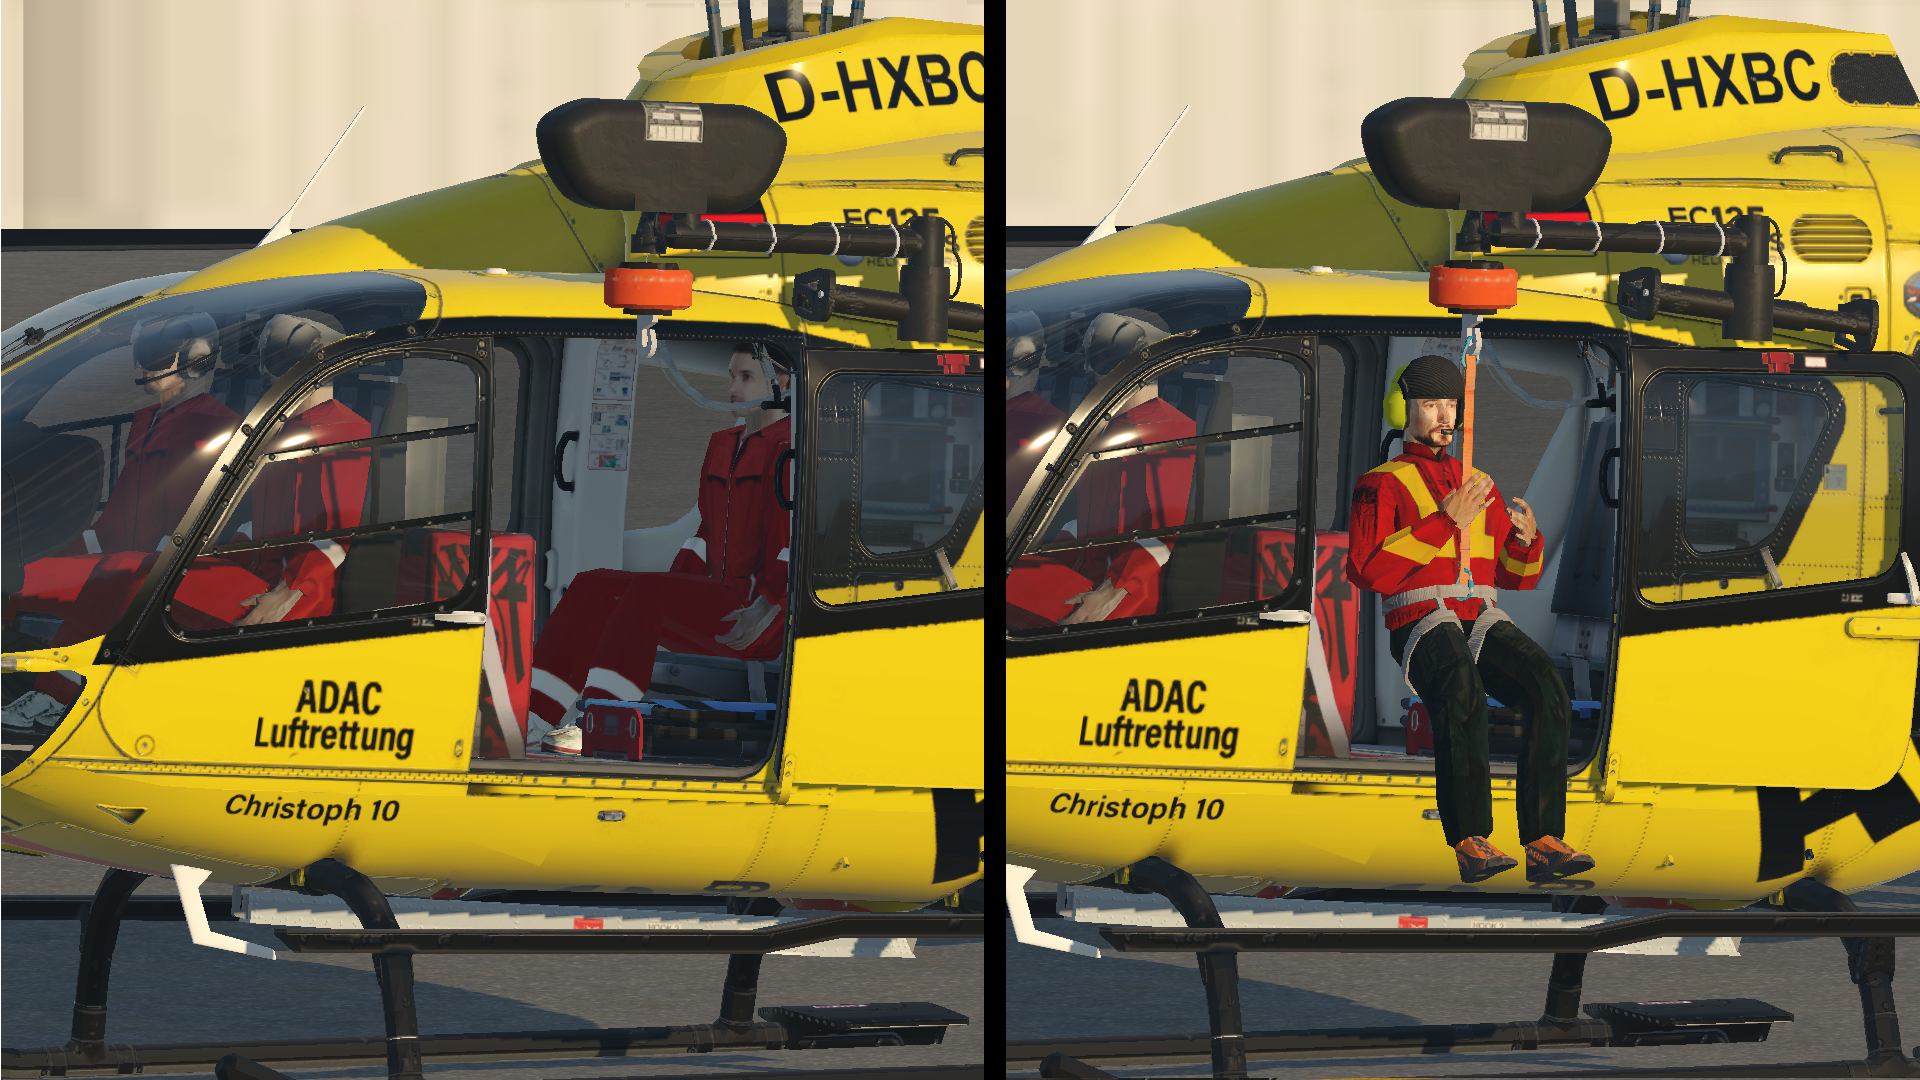
Hoist (Rescue Winch)
To operate the hoist set WINCH CABLE CUT switch at overhead panel to CC-ARM ON. While hoist system is activated CA CUT ARM caution is indicated on CAD. The rest of the operation takes place via a handheld device or via special custom commands. We recommend assigning these commands to joystick buttons or the keyboard.
| Control Pendant | Commands | Remarks |
|---|---|---|
| Boom In/Out switch | Hoist boom turn in Hoist boom turn out |
|
| Reel In/Out thumb wheel | Hoist Cable Down Hoist Cable Up |
|
| CUT Cable push button | Jettison Payload | |
| Cable meter display | Shows the length of the cable. | |
| Caution light | Inidcates cable length within 3 m before reaching fully reeled in or reeled out position. Hoist speed is reduced automatically. | |
| Overheat light | Illuminates when temperature limits are exceeded. Is illuminated for 2 seconds to check operation when hoist is initially powered-up. |
Maximum hoist load is limited to 230 kg. During hoist operation or with fully or partly extended boom and/or opened sliding door VNE is limited to 60 KIAS. Cable length is 50 m.
menu provides 3 additional options to be used with the winch:
When winch cable is in fully reeled in position, pressing Toggle Sling Load will attach the passenger 1 or 2 to the winch and get him off board. His weight is removed from the helicopter and transferred to the winch. Conversely, he gets back into the helicopter if he is already hanging on the winch cabe pressing Toggle Sling Load. The third menu item has no effect on passengers and weight. It allows the user to control all parameters himself.
Pimp your own objects
The mechanism behind the Toggle Sling Load command only works if the objects supplied with this add-on are used as loads. Developers can, however, simply extend their objects in order to use them with this mechanism as well. For this purpose, the EC 135 provides a dataref rotorsim/ec135/hook_unloaded. It indicates whether the object should be drawn or not.
A value of 0 means, the object has to be drawn.
A value of 1 means for a cargo hook object, that it has to be hidden. For a winch object the object has also to be hidden, but the winch hook should be drawn.
The following video demonstrates this behavior for a winch object. The mouse pointer first marks the attachment point. Then it goes to the linked dataref and shows the required animation by changing the dararefs value. The dataref is provided as read-only. It can be monitored by the object, but you can't write to it.
This way the plugin can detach an object while keeping the sling visible. The corresponding weight changes are automatically calculated within the plugin.
Using External Power Unit (EPU/GPU)
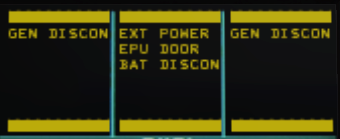
An external power supply can be connected to work on the ground without loading the battery. This function can be controlled via the menu (Connect GPU in the General Operations menu) as well as with X-Plane's standard joystick or keyboard commands for a ground power unit GPU On, GPU Off and GPU toggle.
When connecting a GPU at CAD the Cautions EXT PWR and EPU DOOR come on and indicate that an external power supply is connected and that the door behind which the receptacle is located is opened. As long as the external power is connected, the battery and both generators are automatically disconnected. They cannot be connected together wir the EPU.
If starting of the engines is effected by means of an external power unit, both starter/generators serve as starter for the engines, however, they are disconnected from the helicopter's power supply system as soon as the engines are running.
Charging the battery with the EPU is not possible.
The battery should be connected before powering the helicopter with EPU.
Search and Landing Lights
The helicopter can be configured with two different Search and Landing Lights. The retractable Search and Landing Light left and/or right in the floor of the cell as well as the Spectrolab SX 16 Searchlight. They can also be installed simultaneously and then share the same control commands from the X-Plane standard for spot lights:
- ON (sim/lights/spot_lights_on)
- OFF (sim/lights/spot_lights_off)
- LEFT (sim/lights/spot_light_left)
- RIGHT (sim/lights/spot_light_right)
- UP (sim/lights/spot_light_up)
- DOWN (sim/lights/spot_light_down)
If Search and Landing Light and SX16 are installed in an aircraft at the same time, the Search and Landing Light is automatically controlled via the commands. With the command SX16 (ec135/controls/select_sx16), the control can be switched to the SX16. Triggering the command again switches back to the Search and Landing Light.
In the Plus version it is possible to change the command's function so that SX16 is selected while the command is active. This is done via an entry in the preferences file. This allows the function to be controlled with a toggle switch, as is actually installed in the collective. Only this functionality is available in the Pro version.
If at least one of the lights is switched on, an advisory S/L LIGHT appears in the CAD.
Special features
The Search and Landing Light folds out automatically when switched on. This behavior can be customized in the preferences file. It retracts automatically when switched off. If the Search and Landing Light is completely retracted without switching it off, the advisory LDG L RETR comes on in the CAD.
As an aid to recognizing the target of the control, the user can activate an additional Advisory CTRL SX16 in the preferences file if required. It appears when the controller is switched to SX16. It is also possible to preset the SX16 via the preferences file so that after loading the helicopter the control goes directly to the searchlight and not to the search and landing light.
All functions of the Preferences file are listed in Appendix 1.
Configurator
The helicopter is equipped with a configurator. This allows for a wide range of customization options for each livery. The Aircraft menu contains the menu items , , and . Various options can be selected and deselected here. Some options have multiple variants. These are indicated by a modified entry in the menu.
The base version of the helicopter (EMS, PAX, VIP) cannot be changed with the configurator. It is predefined in the respective livery.
Any changes will only be available until a new livery is loaded or a new flight is started. To permanently save changes, click on the menu item and follow the instructions in the next window.
Notice Configuration changes should only be made on the ground, similar to modifications to a real helicopter. Since the systems are interconnected and rebuild their networks when changes are made, this could lead to undesirable effects during flight.